|
Replacing the Passenger Side Sill and Floorpan
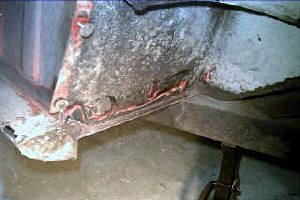
Just a little description of the starting condition of the passenger side floor and sill.
The whole outer seam around the floorpan is slowly rusting away. Both the "A" and "B" posts are rusting through on the bottom. The forward seam at the junction of the firewall and the floorpan is pitted through. The rear is not much better. I will have to be carefull to not remove too much at one time so I can maintain as many reference points as possible. 
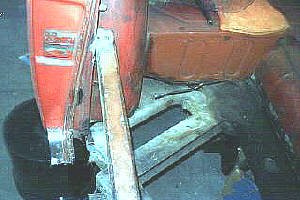
The first thing I did was to weld in a brace across the door opening. There are a lot of ways to do this. You can see that I have already cut thru the sills in this picture but it was the only picture I had. You obviously want to weld it in before you start!

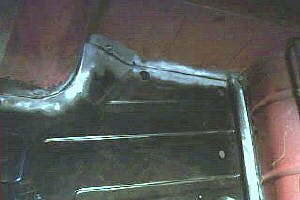
Here is a picture of the forward section of the passenger side floorpan. The picture is a little fuzzy but the front seam between the floorpan and the firewall is filled with little holes of rust. I will have to make a patch to replace about 1-1/2" of the vertical firewall. I just used a wire wheel on a drill to remove the paint. This is before I bought the sandblaster.
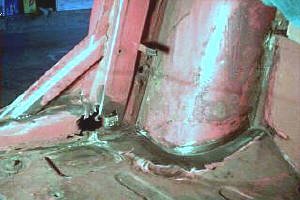
Here is the front of the firewall. If I would have removed about another inch of undercoating, I would have started seeing holes.
I have to start drilling out all the spot welds that atttach the floorpan to the firewall first. 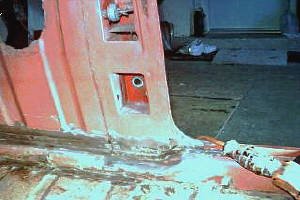
On the left you can just barely see some of the rust thru at the bottom of the "A" post. The joint of the "A" post and the inner sill is all but gone. This will have to be repaired after the new sills are installed.
On the right is a view of the inner "B" post. As you can see, it is eaten away quite a bit along with the inner sill.
More patching for the inner "B" post. There are several areas in the floorpan which have been eaten thru
What I started with...
Metal Cutting Techniques
I used a SawsAll (reciprocating saw) to cut out the middle of the sill. I soon discovered that while the reciprocating saw did a quick job of cutting, it tended to grab alot. There also seemed to be alot of vibration created as the saw cut thru different layers of metal.
A much more acceptable way of cutting out metal was to use my electric die grinder and a 3" cuttoff wheel. While this created a lot of sparks, it actually cut a little faster than the saw and there was no tearing and shaking as with the saw. You can be your own judge but I would strongly recommend the die grinder. As I proceeded to cut near or over the frame rails, it seemed relatively easy to keep the disc off the frame and still cut thru the floorpan. Just be cautious of the sparks. By a good face shield and some welding gloves. take your time and plan how you are going to cut thru. Ultimately, I think a plasma cutter would be by far the best way but at $1,000.00, I think the die grinder works fine.
My Plan
After corresponding with several Triumph List Members who have done this type of repair, I have formulated a plan. I am going to replace one side at a time starting with the passenger side. I am going to remove the floorpan first. then the sills. Next, I am planing to install the new floorpan tacking it in at the driveshaft tunnel and around the back up to the "B" post.
The idea here is to maintain the relationship of the sheet metal from a common reference point (the driveshaft tunnel).
Step 1 - Removing the front half of the floor pan
I decided to take the passenger floor out in small pieces rather than attempting to remove it as a whole. Smaller pieces are much easier to manage and dispose off. If you look at the picture of the door brace, you will see that I cut through the inner and outer sill which exposed the edge of the floor pan.
Next, I made a cut across the floorpan using my die grinder and a 3" cutoff wheel. I started about 2" back from the "A" post to about 2" in front of the driveshaft tunnel. The die grinder was helpful as I could cut thru the bent up channel on the inside of the floorpan.That was as far as I went on the inside for now. Working from the outside, I started removing the outer sill all the way forward. I used a spot weld cutter here but I could have just as easily used a 3/16" drill. If you use a drill, you will automatically have spaced holes to use for plug welds on the new pieces. Doesn't really matter I guess, what ever you prefer. I used the die grinder agaimy n to cut up the top of the The sill all the way forward. The final step is to finish drilling out all the spot welds between the front of the floorpan and the firewall. Going back inside, I used the chisel to separate the front of the floorpan from the firewall. The hardest part of this was separating the floorpan from the inner flange where the transmission cover bolts down. You won't be able to get to all the spot welds with the drill so use the chisel to carefully separate the two pieces. These remaining spot welds separate fairly easily so just take your time. As I had said before, on my car I will have to replace some of the lower firewall so I wasn't too concerned about the way I was proceeding. If I had to do it all over again, I would have probably just used the chisels on the front. 
When I was done, this is what I ended up removing as the first piece of the passenger side floorpan.
Step 2 - Removing the rear half
To remove the rear half of the floor, I started working my way around the remaining piece counter-clockwise starting at the front of the driveshaft tunne. The floor is spot welded to the tunnel through the side of the floor reinforcement. The easiest way to do this was to use the chisels to separate the welds. This was actually quite easy! Again, just take your time.

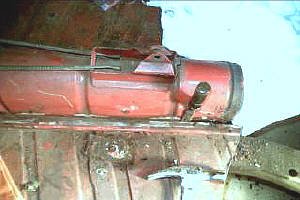
At this point, the drive shaft tunnel is completely separated from the floorpan. The chisel I used to separate the two pieces is shown to the right.
Here is the rear section removed. You can see just a little of the floor hanging on. The floor pan edge is actually folded up against the rear of the vertical panel. I used my small chisel to separate the inner wheel well from the floor.
Now I have to clean up the edges and get ready to install the new floorpan. This would have been the perfect time to sand blast the edges but I didn't have it at this point. I used my drill and wire wheel instead.
Step 3 - Installing the new floorpan.
Before I started installing the new floor pan, I spent quite a bit of time cleaning old paint and undercoating back far enough to make sure I had good weldable metal to attach the new floor. I used a product called "OxySolv" to treat the bare metal so it wouldn't rust before I got it primed. I have some information on OxySolv on my tools page.

Here is the passenger side floorpan ready to install. I have removed the paint at the areas where I will be welding. The lower left area is where the drivshaft tunnel attaches. the rear has a tab that needs to be bent up behind the back of the rear shelf. This was a little tricky as the body tub is still on the frame. I also removed the paint along the right side as that is where the new inner sill attaches.
Here is a view of the new floorpan placed in hte car for the first time. You can see that the fit is overall pretty good. What appears to be a loose fit around the wheel well in the upper left corner can be easily closed up using vise-grips as you will see later.

After I was satisfied with the overall floorpan fit, I started my tack welding at the driveshaft tunnel.
Again, make sure you have bright, clean metal to weld the panel against. 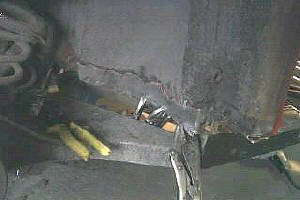
Moving under the car, I used several vise-grips to hold the floorpan and wheel arch together. Then, from inside the car, I tacked the two pieces together. I had to do a few inches at a time, moving the vise-grips as required to maintain a tight joint until I was around the entire wheel arch on the inside. This worked pretty well. You can see at this time I haven't installed the sills yet.
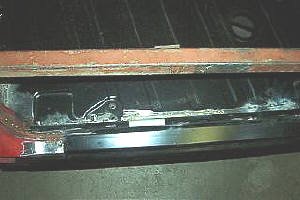
Here is the new sill assembly installed. I had a lot of trouble initially trying to install the two sill halves separately. The problem is that with the downward pressure of the front clip, it is almost impossible to get a nice even mating of the two sill edges that form the door sill.
I had to line up the two sill halves outside the car and weld them together on my workbench. I welded them from the inside so you don't see any welds from the outside. The welded sill assembly was much easier to install! 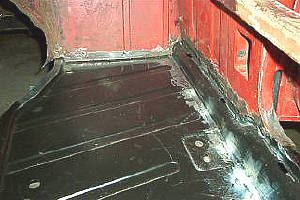
Here is a view looking at the front of the new sill and floorpan. I have spot welded up to the "A" post at this point. I still have to repair the "A" post at this point.
My plan is to fabricate a small plate with a small flange bent to fit on top of the inner sill. I am planning on welding the repair plate to the sill first. Then double checking the door operation first, I will weld the top of the plate to the solid part of the "A" post.
I am going to finish tacking the sill to the floorpan. Before I can weld the front of the floorpan to the front firewall, I am going to have to replace about 2" of the lower firewall because of rust.
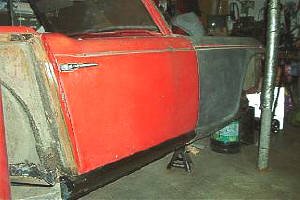
I temporarily installed the passenger door and front fender for a trial fit. The door works OK at this point. I imagine I will have to do this several more times before I am done. You can see my new passenger side sill installed! I still have to weld the bottom of the sill together, it is just bolted together for now using sheet metal screws.
Repairing the Lower "B" Post

Here is a good picture of the bottom of the "B" post. I think this is pretty typical of the type of rust damage you will normally find. I plan on making a patch pieces from cardboard templates and welding them in place.

I am going to fabricate the patch as two separate pieces due to the shape of the repair.
Here is a pattern I made from light cardboard which will fit vertically up against the inner wheel well. The line on the right is the flange that will be bent to sit on the floorpan. 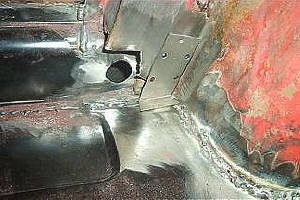
Here you can see I have cleaned off the end of the "B" post and cut off the rusted section.
I then trial fitted the first repair piece. I also punched a couple of holes in the patch so I could plug weld the patch farther up. This one fits into the little recess on the "B" post as shown. 
Here is the second patch for the lower "B" post.
I just made the first cut. The dotted line is going to be the lower flange that will sit on the floorpan. The curved cut in the lower left side is to fit up against the curve of the inner sill. I also have to hammer it flat and do a little fitting. 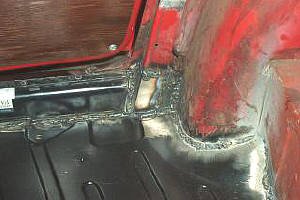
This is the finished repair on the passenger side lower "B" post. I have welded completely around the patches. I just have to finish welding around the floorpan adn do a similar repair on the "A" post.
|