|
Replacing the Battery Box
Like many of you, the battery box in my tub is in pretty bad shape. It must have been bad for a long time because the previous owner had repaired it once using fiberglass.
Seems like there are two things you look for when you get one of these cars, and overdrive and a decent battery box. I don't have either...
I was very lucky to locate a good battery box on the VTR classified ads. I can only hope to be as lucky with the overdrive...
I have heard that some of the UK suppliers can supply a new battery box for TR4A's. If someone knows of a source please forward it to me.
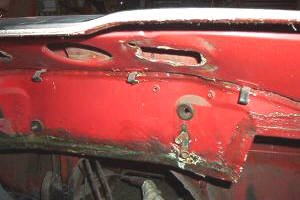
The "Before" Pictures

Here is a view from the inside of my tub of the current battery box. The nasty green stuff is fiber glass. It extends completely underneath the entire battery box.
Here is another view of the inside of the old battery box.

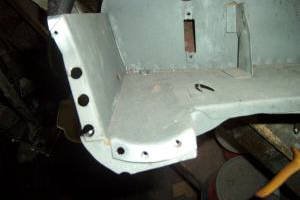
This view shows the outside of the old battery box. As part of my plan, I am going to remove all the finish, then the fiber glass. You can see the small shelf over the passenger side foot well has been stripped along the top of the dash.
I had been using paint remover and wire wheels up to this point to remove paint. Recently, I purchased a sand blaster which was a giant leap forward in getting this ready for paint. Look in the tools section for more information on the sand blaster. 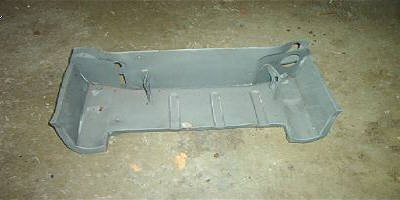
Here is a picture of the donor battery box. It has been sand blasted and coated with OxySolv. I have a little preparaton work before I can move on.
Preparing the donor battery box

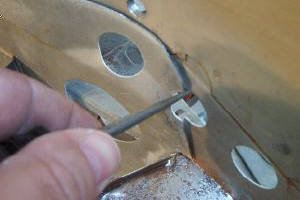
Since the battery box was cut out of another car, there are remnants of the welds that I have to remove before I can install it. I have tried a couple of different spot weld cutters, the results of which are shown in the following pictures. I changed to a 1/8" pilot drill followed by a 3/16" drill to remove spot welds. The reason is that the spot weld drill cut way too much material out of the flange I wanted to keep.
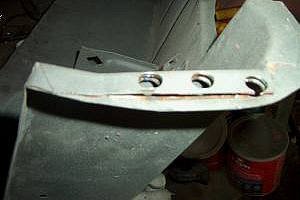
Here is a picture of the flange I have to remove. The flange extends all the way around the front of the battery box. The front is fairly easy to get ready to install. The rear is cut to fit just under the horizontal seam about half way up the firewall. The sides will take the most effort to weld in as you will see later. First, I need to remove the old flange as shown to the right.

I started on the passenger side, in front of the battery box. It is kind of hard to tell here but there are 3 spot welds down the left edge shown in the picture to the right. Also, at the bottom there is a small braze joint. I think during the manufacturing process, they must have brazed the corners together while the pieces were still in the assembly fixtures, then it was spot welded.
Did I say 3 spot welds... Still can't see the end one. It is hidden in the folded corner at the top. I want to save the corner for now if possible.
Also, you can see pretty clearly in this view that the spot welder drill is way too big for this flange. I will be able to fill the hole with weld but why make it harder than I have to. You can also see rust starting to appear from under the flange! 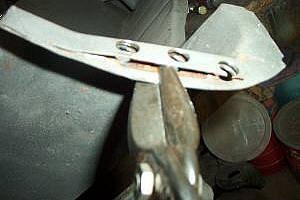
Being a believer in removing things slowly and in small pieces, I am cutting the first flange into two pieces. This will make it easier to release the left end without deforming the battery box.

You can see in the picture to the right that there is a small braze tack in the bottom corner of the battery box. You can also see a couple of the next welds to remove.

Here is a better view of the next spot welds.
On these next spot welds, I used a 1/8" pilot drill, then a 3/16" drill to cut the weld out. It was interesting that I noticed that as I drilled through the first piece and the weld separated, there was a distinct "click".
Since I am throwing the back piece away, it didn't make sense to be that careful. I really prefer the results using the regular drill bit. Now I just need to heat up the little braze joint in the corner ant the piece should come off. 
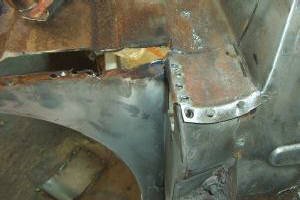
Moving around the piece, there are some heavy spot welds attaching the inside corner of the battery box. There are actually 6 spot welds here!

Before I drill out those spot welds I am going to cut the inside corner so I can work the welds free easier.

Having drilled those 6 spot welds, I have worked the next section of the old flange loose to the cut I just made.

Here is a picture of the front flange as I worked across to the other side. In the interest of keeping file sizes down I won't post pictures of the progress around the rest of the front. You get the idea I think. The next step is to get the tub ready. I will start on that tomorrow.
Removing the old battery box
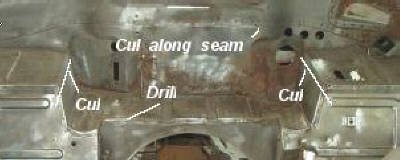
The next step is to remove the old battery box. I used the same basic technique to remove the old battery box as I did removing the remaining flanges from the donor part. In the first picture below I have drawn up my plan for removing the old box. The battery "box" actually runs across the top of the entire engine compartment as you know. Creating not only the battery box but the shelf on both sides of the box. The donor piece has been sectioned out of a original piece in a way that allows me to fairly easily re-install it into my car. My intent is to cut the old piece out by first cutting the two shelves off about 1/2" down the inside edge as shown in the first picture. This will create a "lip" which I will hopefully be able to tuck the new piece behind. The front will come loose just like the new piece by drilling out all the spot welds across the front. The rear of my donor piece was cut right at the horizontal seam that runs about half way up the back of the wall.
Cutting out the old Battery Box
Here is my first cut. It is hard to get the orientation right from the picture to the left. If you look at the upper picture, it is cut on the left battery box.
In the picture to the right, you can see I have gotten to the opposite end of the battery box. I have drilled out most of the spot welds and am continuing across the shelf that the clutch and brake master cylinders mount on.
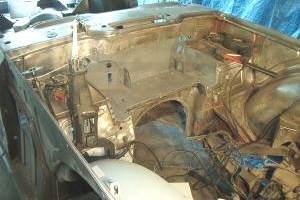
Here is a view of the new battery box being test fit into the opening. It doesn't fit too bad for the first try. There are a lot of little cuts to make to get a better fit but that is for next weekend hopefully.
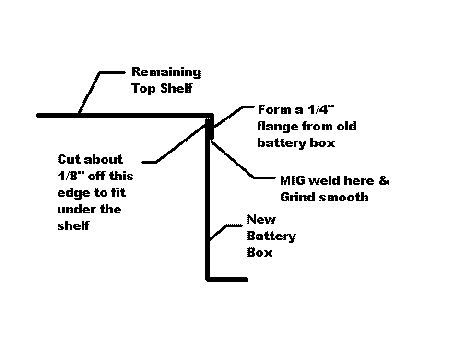
Installation Plan
Well, now that I have the old battery box removed I can plan the installation. Once the box is fitted, the front should just weld right up to the existing fire wall. The rear will hopefully just mate up to the rear firewall along the horizontal seam that runs across the top of the firewall. The sides are going to be the tricky part. I have included a drawing below to show you what I am planing there. When I cut out the old battery box, I left some material to allow me to create a flange as shown below. I was planning on leaving a 1/2" flange but it ended up being about 1/4". I don't think this is going to be too bad as I am hoping that by careful weld grinding, the finished seam will not be noticable.
Preparing the Firewall
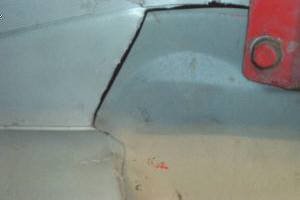
Here I am using a awl to scribe a new line for the edge of the firewall. Just taking it slow. Hopefully I won't be too far off. The biggest problem is getting the piece in and out each time for the fit.
The fit is very close so I don't have huge holes to fill in when I weld. I am going to try the "Planishing" method of welding this area. The object is to hold the pieces edge to edge. Then, just use very small MIG welds. After each weld, you use a body hammer and dolly to mash the bead flat into the seam while it is still hot. The goal is to end up with no noticeable weld seam. Stay tuned for that.. 
The next step is to sand blast the entire firewall, inside and out one more time to remove any remaining rust.
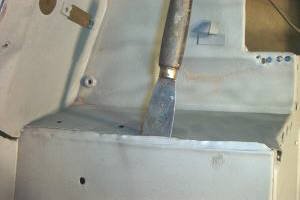
In the picture to the left, I am using a putty knife to lead the top of the new battery box under the new flange.

I pulled the hood latch out of it's storage box to use as a installation fixture to hold the rear of the battery box up tight to the firewall seam and to also make sure the latch will fit later!
I had to use my trusty awl to help locate some of the holes. You can also see that I have hammered the new flange down over the new battery box. I will get a better picture of this tomorrow. 
Here is my first plug weld on the new piece. It is finally going in. I was going to wait until tomorrow but what the heck!
Now to tack the other end of the passenger side. This is a little bigger gap than I intended but it shouldn't be a problem. The object here is to hold a copper bar behind the weld and use very short bursts of welding.
I can use my grinder to smooth out the welds after I get done. 
Here is a picture of one of my copper bars that I use for backing up my MIG welder. I bought a 4 bar set from The Eastwood Co..
One interesting point I discovered is that the weld under the bar is always flat and smooth because of the smooth copper surface. Just thought I would pass that on. 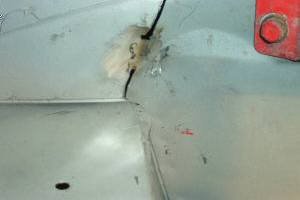
In the picture to the right you can see I have started to make some progress in my butt weld up the passenger side. You can also just barely see the very end of the new flange is not bent down yet due to the hood latch interference with the hammer.

I have made a little more progress on the butt weld here. This is a slow process but when it is done, the weld should be practically invisible (I hope!).

This was my first weld the next moring! Notice anything good about it? Me either... I discovered that I forgot to turn on the gas to the welder!! I am going to have one more cup of coffee before I preceed!

Here I finished plug welding the bottom. Notice the problem where the speedometer cable goes thru the firewall!! Oh well, we can fix that but I will save it for last.

I am about half way through repairing the speedometer hole. I used my copper bar again to back up the welder. Just a little more and then grind it flat and I should be done.

Here is the repaired hole. Not too bad if I don't say so myself. The rubber grommet should cover what is left.
I ended up sand blasting the battery box and firewall again because of all the welding debris. It was hard talking myself into breaking out all those tarps again but I think it was worth it.
Well that about does it for the battery box repair. I still have to prime the bare metal but I want to coat it with Oxysolv first. I have a new page for priming which shows the battery box finished it epoxy primer.

|